The material panel enabled developers to set up materials of shapes.
For information about materials, read the "Materials" page in the Creators section.

The material panel contains these controls:
| Control | Action | Remarks |
|---|---|---|
 |
Select the prior material. | |
 |
Select the next material. | |
 |
Open a list with all available materials. | Select a material with a double click. |
| Information below | An information how often this material is used. | |
 |
Copy the material properties into the memory. | A material in memory will be removed if a shape is removed in the scene. The green button marks a material in memory if you click it. |
 |
Apply the material properties from memory on this material. | A material in memory will be removed if a shape is removed in the scene. The green button marks applied properties from memory if you click it. |
 |
Opens the diffuse properties window. | Is blue if a property not set to default. |
 |
Opens the emissive properties window. | Is blue if a property not set to default. |
 |
Opens the bump map window. | Is blue if a property not set to default. |
 |
Opens the surface properties window. | Is blue if a property not set to default. |
 |
Opens the rendering properties window. | Is blue if a property not set to default. |
 |
Opens the weathering properties window. | Is blue if a property not set to default. |
 |
Opens the specular properties window. | Is blue if a property not set to default. |
 |
Opens the scattering properties window. | Is blue if a property not set to default. |
 |
Opens the material flags window. | Is blue if a property not set to default. |
 |
Looks automatically for textures and applies them. | See remarks below how this feature works. |
| ▼ Color Space | Sets the color space for the diffuse and emissive color. |
The screen color space is by default the Rec. 2020 color space. These color spaces are supported:
|
If you click the "Auto" button, the object editor will automatically look for matching material textures. The base file name build by the shape file name and the material name. For example, with a shape file name "MyHouse0815" with a material named "Base", for a diffuse map the editor will look for a file named "MyHouse0815_Base_Albedo.map".
The application will look up these textures:
| Texture Slot | Requested file name |
|---|---|
| Diffuse | {Shape file name}_{Material name}_Diffuse.map, or {Shape file name}_{Material name}_Albedo.map |
| Emissive | {Shape file name}_{Material name}_Emissive.map, or {Shape file name}_{Material name}_Ambient.map (applies the ambient flag also) |
| Bump | {Shape file name}_{Material name}_Bump.map, or {Shape file name}_{Material name}_Normal.map |
| Surface | {Shape file name}_{Material name}_PBR.map |
| Specular | {Shape file name}_{Material name}_Specular.map |
| Scattering | {Shape file name}_{Material name}_Subsurface.map |

The diffuse properties window contains these controls:
| Control | Action | Remarks |
|---|---|---|
| ▭ Color board | Click on the board to open the color window to select a new color. | |
| ▭ Texture board | Click on the board to select a new map or click on the "Clear" button to remove the map. | Select a RGBA texture. RG and R textures work too. |
| ▢ Alpha Mask | Check this button if you want to use the mask value to clip pixels below an alpha value. | |
| ↹ Opacity | Move the slider to set the overall opacity of this material. | |
| ↹ Mask | If alpha masking is applied, the value to compare against visibility of a pixel. |
For information about materials, read the "Materials" page in the Creators section.
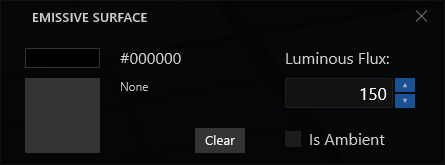
The emissive properties window contains these controls:
| Control | Action | Remarks |
|---|---|---|
| ▭ Color board | Click on the board to open the color window to select a new color. | |
| ▭ Texture board | Click on the board to select a new map or click on the "Clear" button to remove the map. | Select a RGBA texture. RG and R textures work too. |
| ⭿ Luminous Flux | Set the light intensity of this object up to 4000 Joule. | 2000 Joules is for front light and outdoor passenger information displays in Germany as usual. 4000 Joules is for the upper beam light in Germany as usual. |
| ▢ Is Ambient | Move the slider to set the overall opacity of this material. | If enabled, the pixels are added; otherwise the color is the minimum. |
For information about materials, read the "Materials" page in the Creators section.
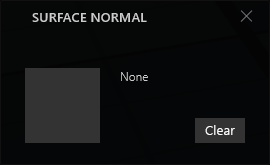
The bump map window contains these controls:
| Control | Action | Remarks |
|---|---|---|
| ▭ Texture board | Click on the board to select a new map or click on the "Clear" button to remove the map. | Select a RG texture which is encoded into a sphere map. |
For information about materials, read the "Materials" page in the Creators section.

The surface properties window contains these controls:
| Control | Action | Remarks |
|---|---|---|
| ▭ Texture board | Click on the board to select a new map or click on the "Clear" button to remove the map. | Select a RGBA texture. |
| ↹ Roughness | Move the slider to select a base roughness for the surface material. | To sum up, describes how less-shiny a surface appears. |
| ↹ Metallic | Move the slider to select a base metalness for the surface material. | To sum up, describes how reflective a surface appears. |
| ↹ Refraction | Move the slider to select a refraction index. | For reflected pixels, the refraction index from to 1 to 2.55. |
For information about materials, read the "Materials" page in the Creators section.
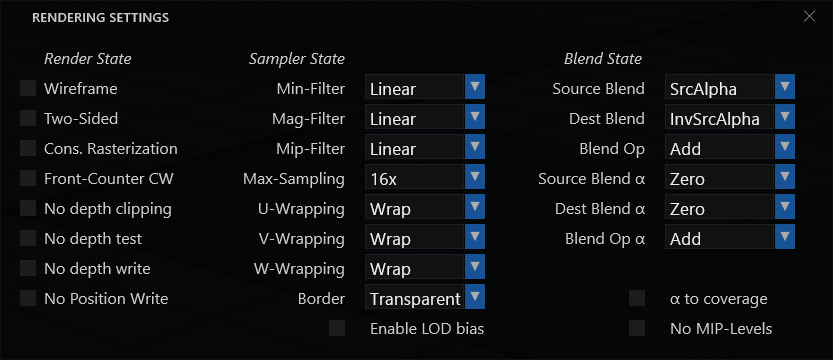
The rendering properties window contains these controls:
| Control | Action | Remarks |
|---|---|---|
|
▢ Wireframe |
If enabled, the geometry is rendering as a wireframe model. | Left column. |
| ▢ Two-sided | If enabled, both sides of the faces will be rendered. | |
| ▢ Conservative Rasterization | If enabled, any pixels on a triangle edge will be rendered. | |
| ▢ Front-counter clockwise | If enabled, the winding-order of triangles will be flipped. | |
| ▢ No depth clipping | If enabled, the object will be rendered far away even it is outside the clipping region. | This is useful for objects more far away than 16 km. Notice that there is no depth test outside the view frustum. |
| ▢ No depth test | If enabled, all pixels will be drawn, also if hidden by a object before. | |
| ▢ No depth write | If enabled, no depth information will be written into the depth buffer. | This is useful if you have interior window glas and you want to look outside. |
| ▢ No position write | If enabled, no position information will be written into the position buffer. | This is useful if you have interior window glas and you want to look outside. |
|
▼ Min-Filter |
Sets the texture sampling filter nearby the player. | Middle column. |
|
▼ Mag-Filter |
Sets the texture sampling filter far from the player. | |
|
▼ Mip-Filter |
Sets the sampling method between different mip levels of texture. | |
|
▼ Max-Sampling |
For anisotropic rendering, the maximum number of samples per texture sample. | |
|
▼ U-Wrapping |
The method how to repeat textures on the u-axis (or x-axis). | |
|
▼ V-Wrapping |
The method how to repeat textures on the v-axis (or y-axis). | |
|
▼ W-Wrapping |
The method how to repeat texture on thw w-axis (or z-axis). This is not used in the renderer but exists for maybe future use. | |
|
▼ Border |
If any wrap method is border, the color of the region outside of the texture. | |
| ▢ Enable LOD bias | If enabled, the MIP bias is set to -2. | Useful for labels. |
| ▼ Source blend | The source blend color. | Right column. |
| ▼ Destination blend | The destination blend color. | |
| ▼ Bleop operation | The color channel operation for source and destination. | |
| ▼ Alpha source blend | The source alpha value. | |
| ▼ Alpha destination blend | The destination alpha value. | |
| ▼ Alpha blend operation | The alpha channel operation for source and destination. | |
| ▢ α to coverage | If enabled and multi sampling is active, more samples will be gathered for a transparency mask. | Useful with alpha masked textures. |
| ▢ No MIP levels | If enabled, alway the first mip level is sampled. | Useful for labels. |
For information about materials, read the "Materials" page in the Creators section.
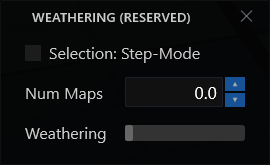
The weathering properties window contains these controls:
| Control | Action | Remarks |
|---|---|---|
| ▢ Selection: Step-Mode | If enabled, the weathering maps do not blend. | Reserved feature. |
|
⭿ Num Maps |
The number of weathering maps to look up. | Reserved feature. |
|
↹ Weathering |
The current weathering. | From 0 % to 100 %. Reserved feature. |
For information about materials, read the "Materials" page in the Creators section.

The specular properties window contains these controls:
| Control | Action | Remarks |
|---|---|---|
|
▭ Texture board |
Click on the board to select a new map or click on the "Clear" button to remove the map. | Select a RGBA texture. |
|
↹ Power |
The power of the specular reflection. | From 0 % to 400%. Requires a not-rough material to appear. |
| ↹ Exponent | The exponent of the specular reflection term. | From 0 to 64. |
| ↹ Metallic | Describes if the specular reflection is rough or reflective. |
For information about materials, read the "Materials" page in the Creators section.

The scattering properties window contains these controls:
| Control | Action | Remarks |
|---|---|---|
|
▭ Texture board |
Click on the board to select a new map or click on the "Clear" button to remove the map. | Select a R or a RG texture. |
| ▢ Translucent sub-surface | If the surface gets lighted from both sides, enable this feature. | This is common for leafes. |
For information about materials, read the "Materials" page in the Creators section.

The material flags window contains these controls:
| Control | Action | Remarks |
|---|---|---|
| ▢ Has opacity | Marks the material to have opacity material. | This feature has impact when a node gets drawn and also has impact how intersection tests are done in the raytracer. |
| ▢ No position-write | If enabled, no position information will be written into the position buffer. | This is useful if you have interior window glas and you want to look outside. |
| ▢ No ambient occlusion | For this pixel, no ambient occlusion or global illumination is computed. | |
| ▢ No depth-write | If enabled, no depth information will be written into the depth buffer. | This is useful if you have interior window glas and you want to look outside. |
For information about materials, read the "Materials" page in the Creators section.
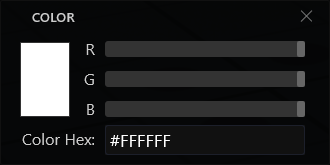
The color window contrains these controls:
| Control | Action | Remarks |
|---|---|---|
| ▭ Color board | - | Shows the current color. |
| ↹ R | Select the red color. | Has 200 steps. The accurate color depends on the color type (Rec. 2020 is default, PT. 709 can be enabled). |
| ↹ G | Select the green color. | Has 200 steps. The accurate color depends on the color type (Rec. 2020 is default, PT. 709 can be enabled). |
| ↹ B | Select the blue color. | Has 200 steps. The accurate color depends on the color type (Rec. 2020 is default, PT. 709 can be enabled). |
|
⌨ Color hex |
Enter a color code. |
The color code is interpreted as a color value. To set the opacity of the material, use the opacity slider in the diffuse color window. |
For information about materials, read the "Materials" page in the Creators section.